"And God is able to bless you abundantly, so that in all things at all times, having all that you need, you will abound in every good work." 2 Corinthians 9:8
As you might suspect, cooking is a challenge for someone with a corn allergy. We have a very limited pool of safe ingredients to use. We’ve spent about 18 months, so far, sorting out safe ingredients and brands and we are slowly adding to our repertoire of available items. We have learned the art of creative substituting when cooking/baking. I will say, though, we are extremely blessed to have an amazing farm market near us and we are able to purchase 90% of our groceries from them year round. (If you live in Maryland, we highly recommend Local Homestead Products in Marston) Anyway, all of that is to say, when we find a new recipe we can make, we celebrate. And when everyone in the family loves that new recipe, we REALLY party! (And a bonus is that this homeschool mom makes it educational by having the kids help make it!)
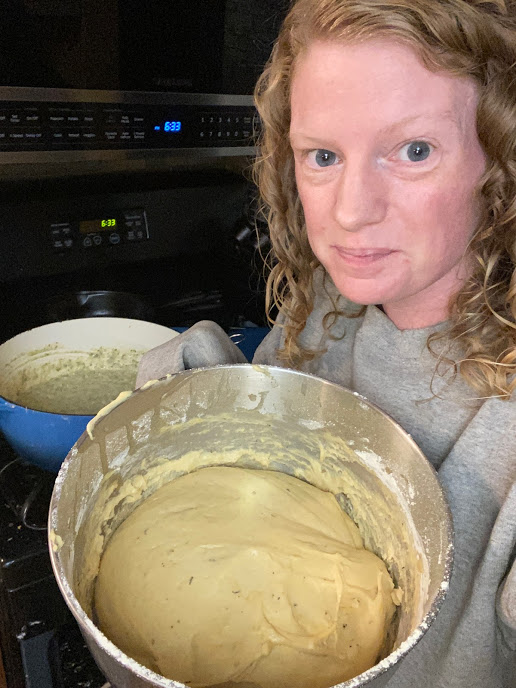
Our most recent addition to our recipe book is homemade tortellini. Tortellini was one of my favorite dishes to order when we lived in Europe and I have been missing it, so I decided it was time to try my hand at it. However, there’s one big catch, we do not have a safe ricotta cheese. Here is where that creativity in substitutions comes in. I knew I needed a creamy, cheesy base for the filling, so I thought I’d try to make a thicker version of the filling I use for our hot pockets. I added more flour and more cheese and it worked out nicely. I may not be the best judge since I haven’t had actual ricotta in years, but I could barely tell the difference.
Here’s what I did step by step to make our homemade tortellini. Also, just a warning, I’m HORRIBLE about measuring things..I kinda just wing it. These amounts are all estimated, but this should give you a decent idea of what I did.
This made enough Tortellini for 6 of us to eat and have a little bit leftover.
Ingredients: 2 Pints Heavy Cream (split)
Garlic Powder
Salt
Basil
⅓-½ C shredded Cheese (any dry, aged cheese)
1-2 C Chopped Spinach (or more!)
⅓ – ½ C Butter
4ish Cups of Flour (3C is for the dough)
Pepper
Thyme
Paprika
1 onion, chopped
⅓ – ½ C Water
3 Eggs
Filling:
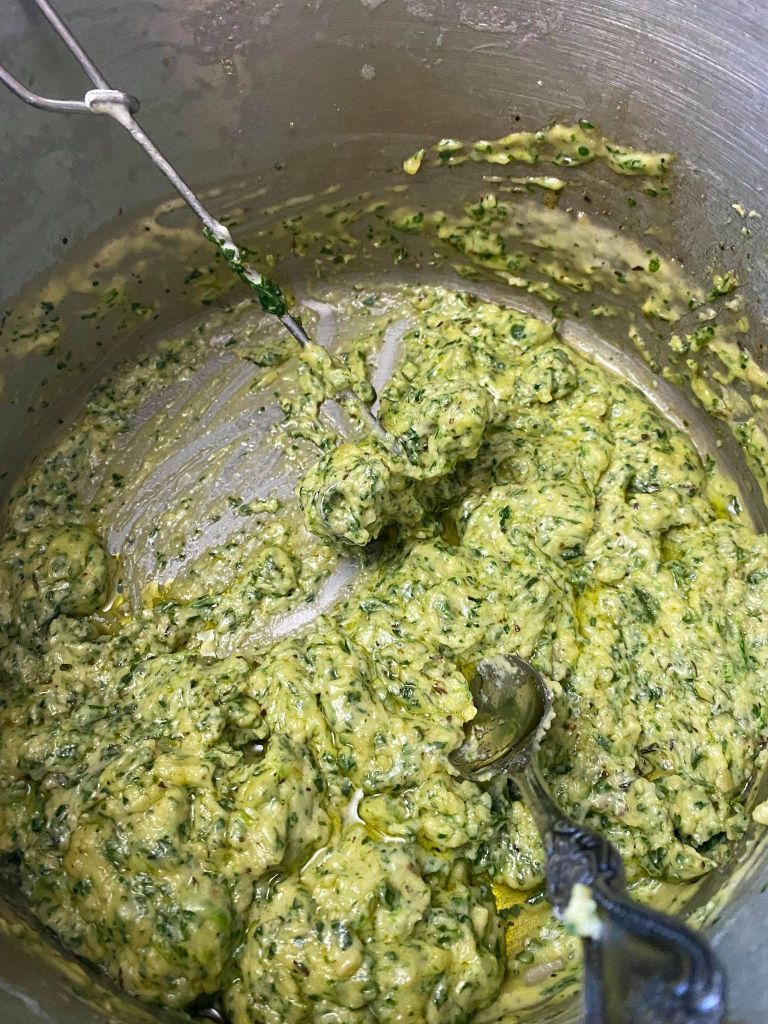
Boil a pint of heavy cream until it starts to thicken and reduce.
Stir in a flour paste (1-2 TBSP flour mixed with 1-2TBSP water) until the filling gets to a consistency that is paste-like
Mix in garlic, salt, pepper, thyme, basil, paprika, and cheese (we use Dubliner, but you could use Romano or Parmesan).
Add in finely chopped fresh spinach
Let cool
Of course, if you have ricotta, you could just use that with spinach and some cheese and seasonings.
Pasta:
Add 3 C of flour in a mixing bowl and make a well in the middle of the flour
Add 3 eggs into the well
Start to mix with a dough hook (we used our kitchenaid…you could do this by hand and no dough hook)
Slowly add water until dough forms (probably only a few TBSPs. You may not use all the water)
I also added some melted butter (2TBSP) just to make the dough easier to work with (this may not be necessary for most flours, but we have a specialty, lower gluten flour, so butter helps it be less sticky)
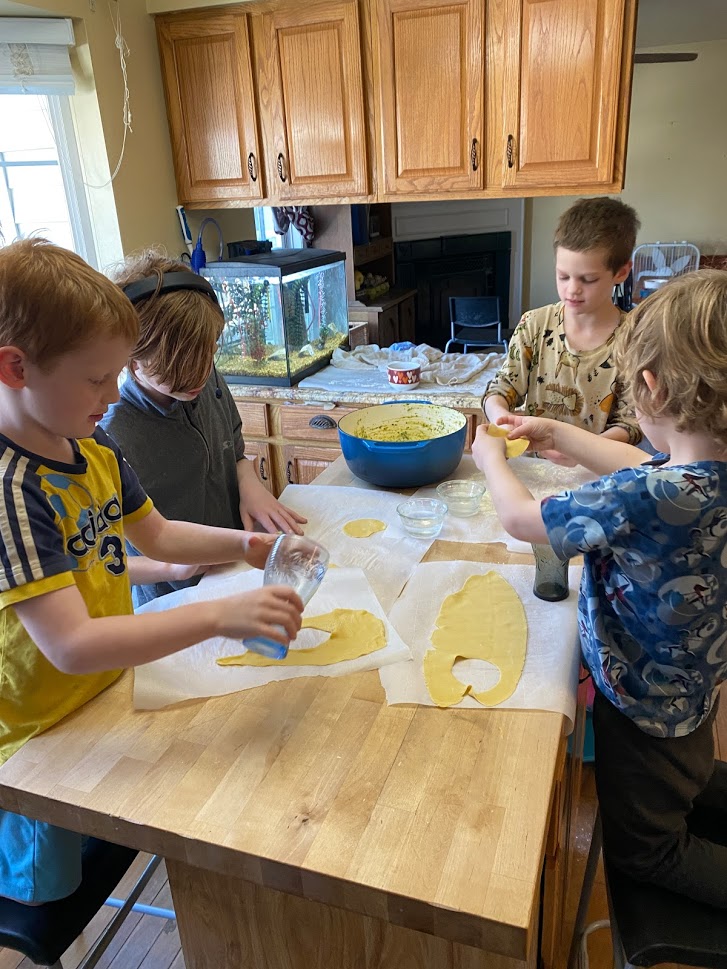
Roll the pasta out thin. (On the kitchen aid pasta roller I used 6 or 7 on the dial)
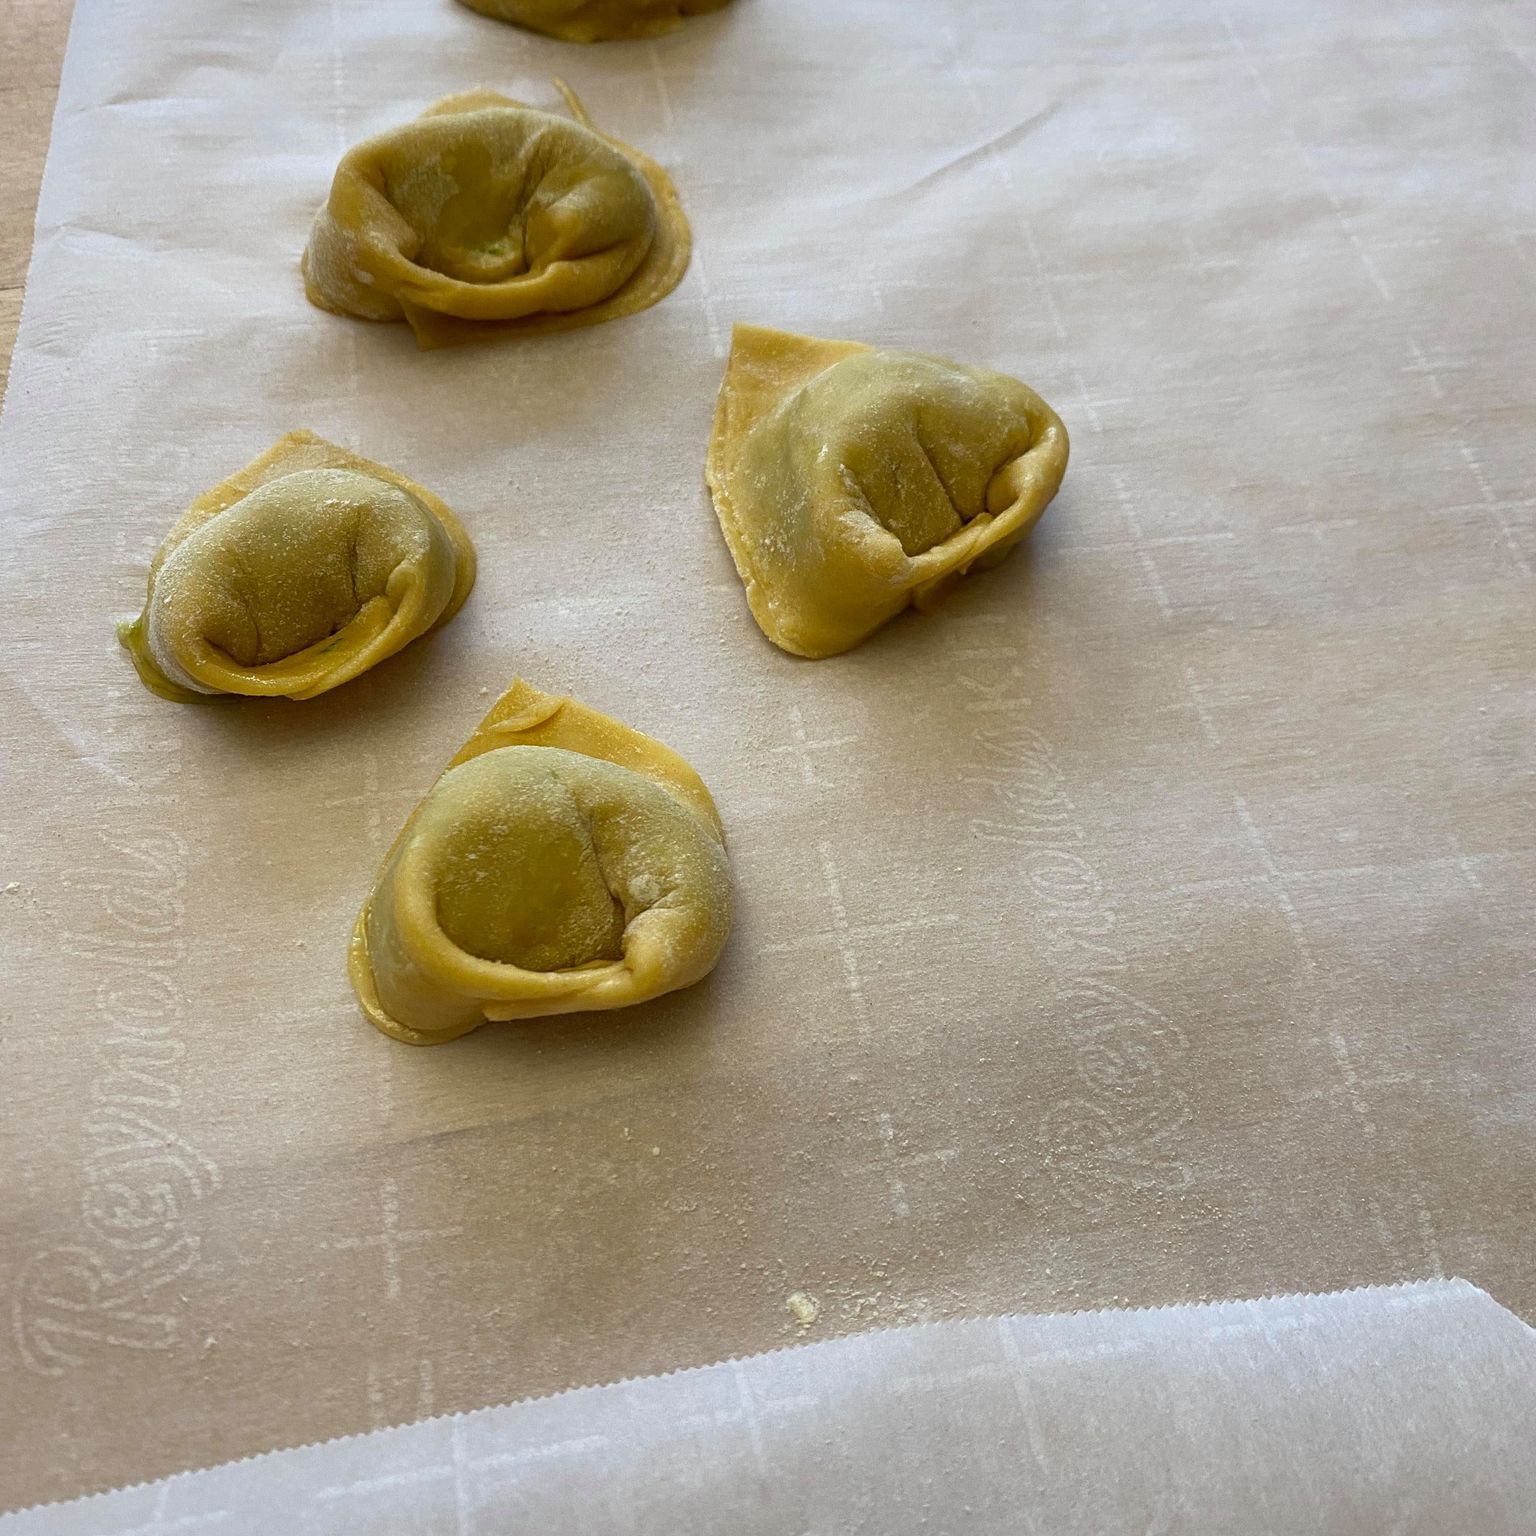
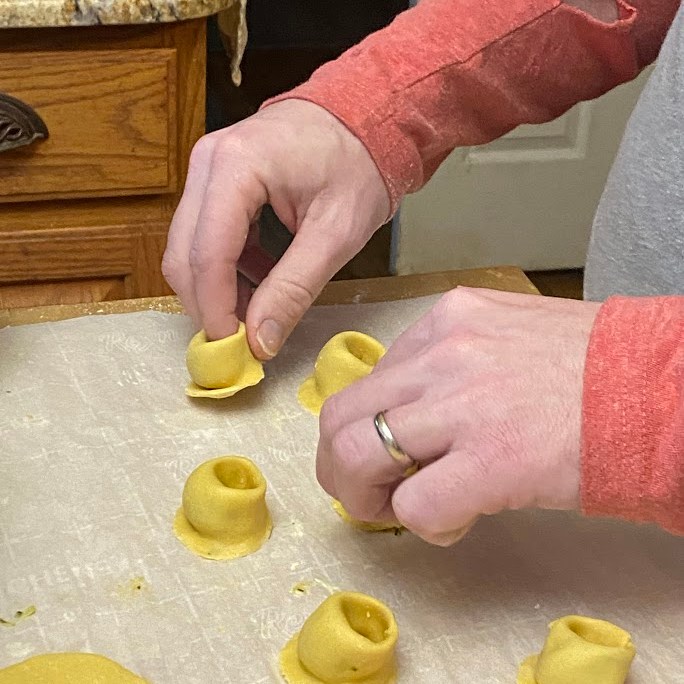
On a lightly floured surface, cut the sheet into squares. (I just used a pizza cutter) We also have done circles and used cookie cutters or round glasses.
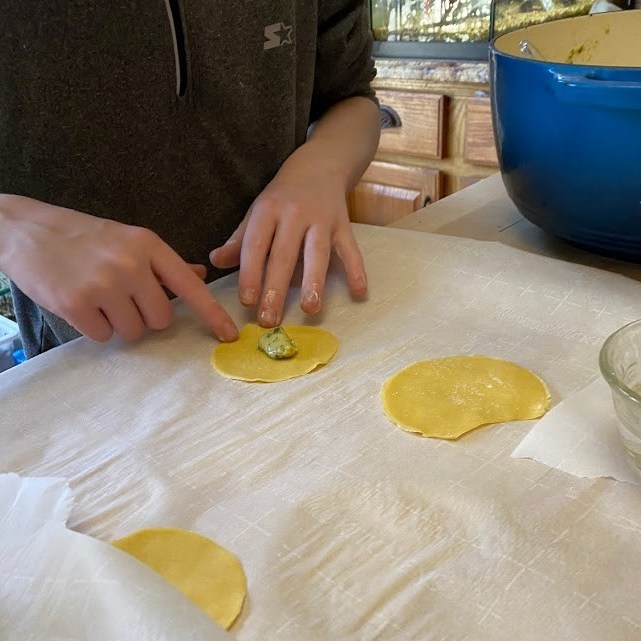
Add a dollop of the filling into the center of a square or circle.
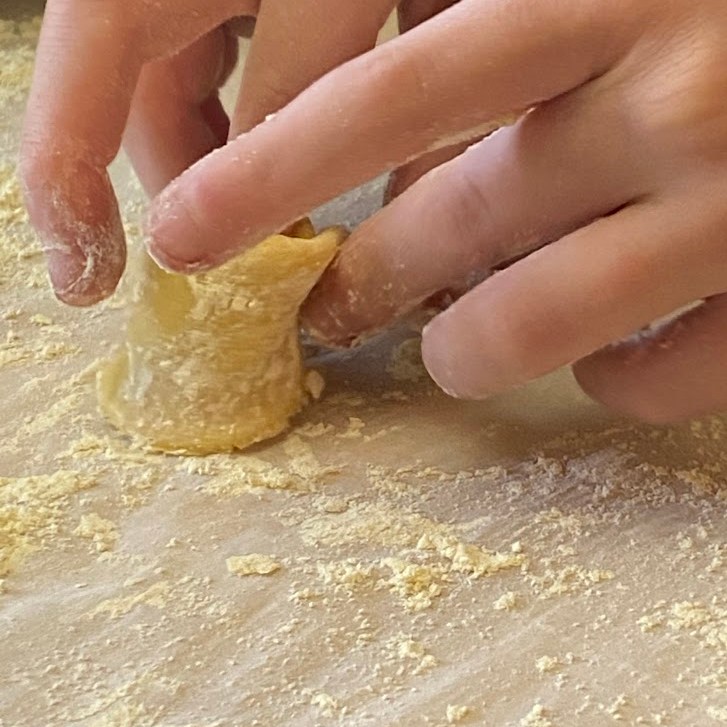
Dip your finger into some water and get the edges of the square/circle wet. Then fold into a triangle/half moon and press down the edges. Then take the sides of the triangle/half moon and bring them together and press so they stick.
Keep the unused dough and the tortellini covered with a kitchen towel. They will dry out easily.
Once they’re all made, toss them in boiling water. They’ll float when done
Remove the floating tortellini with a slotted spoon and add to your sauce.
Sauce:
Sautee a chopped onion in 4TBSP butter.
Add 4TBSP flour to make a roux and then whisk in a pint of heavy cream.
Whisk occasionally until thickened.
Add seasonings (we used garlic, pepper, salt, thyme, basil, and a little more cheese)
Then add the cooked tortellini into the sauce and serve. (you can also add some shredded cheese on top)
One of the most popular foods in our house, right now, is homemade hot pockets. We’ve had a few requests for the recipe, so I thought I’d take the opportunity to write it all out. Don’t worry, I hate those cooking blogs where there’s a bunch of talking before the recipe, so I’m just gonna jump right in!
This recipe takes about 45-60 minutes of prep and 20-25 minutes to bake.
Ingredients:
(makes about 8 hot pockets)
Dough:
1 ⅓ C Warm Water
1 TBSP sugar
1 packet active dry yeast
2 TBSP melted butter (can sub an oil instead of butter)
3.5 C Flour
Seasoning (we use garlic, thyme, salt, pepper, paprika, and cheese if we’re feeling fancy)
1 egg
1TBSP cool water
Filling:
1 small head of broccoli chopped into small pieces
½ onion chopped (we chop it SUPER small with our food chopper)
4TBSP Butter (or oil)
4TBSP flour
⅓ – ½ C shredded cheese
Seasoning (again, we use garlic, thyme, salt, pepper, paprika)
½ pint heavy cream (you can use half and half or milk, but may need to increase the butter and flour)
Instructions:
Combine the warm water and sugar into a mixing bowl. Stir until most of the sugar is dissolved, then add the yeast and gently stir. I have found if I stir too vigorously, I kill the yeast. Allow the mixture to get a foamy layer as the yeast starts to work. This will probably take 5-10 minutes. If you find it’s not foaming, you may have killed the yeast. You can try placing the bowl in a warm oven to help it along. If that still doesn’t work, then start over with a new packet of yeast.
Once you have a thick foamy layer, add the melted butter (or oil) and seasonings to the water/yeast mixture.
Add in the flour ½ C at a time, using a dough hook on your stand mixer to mix. Continue adding until the dough pulls away from the sides of the bowl (you may not use all the flour, or you may need a little extra). Continue kneading the dough for 3-5 minutes. If you don’t have a stand mixer, you can combine and knead by hand. (10 minutes)
Once you have a ball of dough, cover and allow it to rest in a warm area of the kitchen until it has doubled. This takes about 20-30 minutes for us, but I am not super picky about letting it completely double. I let it sit for however long it takes me to make the filling. If it hasn’t fully doubled, then I just use it anyway, as long as it has done some rising.
Dough before allowing it to rise.
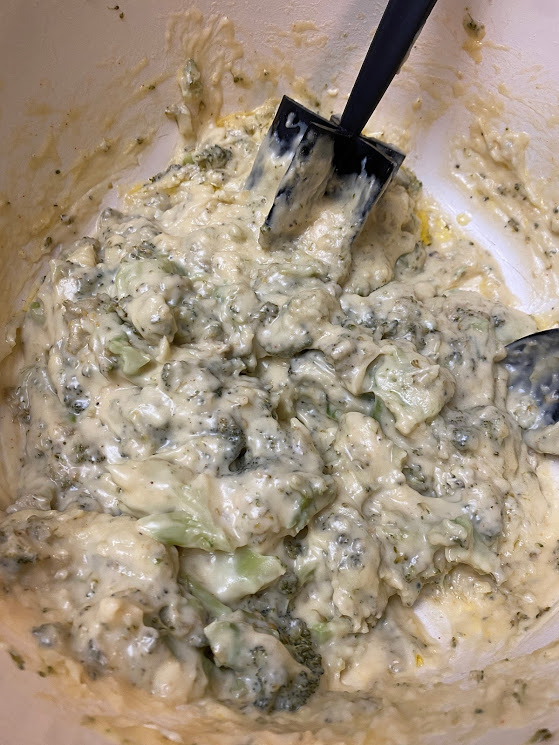
While the dough is rising, make the filling:
Boil the broccoli until tender.
While the broccoli is boiling, melt the butter in a sauce pan and saute the onion.
Whisk in the flour to make a roux, whisking constantly.
While whisking, add seasonings to taste and then add all of the cream. Don’t stop whisking or you’ll get clumps. If you do get clumps, don’t worry, you can whisk them out as much as possible, but if you can’t get rid of them all, no worries. They are barely noticeable when in the hot pocket.
Keep whisking occasionally while bringing the creamy mixture to a simmer (uncovered) and allow it to thicken.
Once it’s a good, thick, gravy-like consistency, add in the cheese and mix until it’s all melted, then reduce the heat.
Drain the broccoli and add it into the creamy mixture and stir. Remove from heat.
Creamy broccoli & cheese filling ready to go into the pockets.
Now it’s time to make the hot pockets.
Preheat the oven to 400*F
Beat down your risen dough and put it on a floured surface. I usually do a little more kneading at this point, but not a lot. Add a little flour if the dough is sticky.
Divide the dough, cutting the ball in half, then the halves in half, and so on until you have 8 equal pieces.
Roll out one piece at a time. I just flatten by hand and I don’t worry about them being perfect rectangles…as long as I get it close. (Tip: once I have it flattened out, I put a floured spatula under half of it so I can easily transfer the pocket to the baking sheet once it’s filled)
Scoop about ⅓ – ½ C of filling onto the dough. (if using the spatula tip above, put the filling on the side that is on the spatula, NOT like I did in the photo…it didn’t work out so well, haha)
The hot pocket before folding over and pinching the edges.
Fold the dough over and pinch the edges or push the edges with a fork to keep it closed.
Transfer the hot pocket to a prepared baking sheet (we use parchment paper for easy clean up) Then repeat the process for the remaining 7 pieces of dough.
Once you have them all on your baking sheet, cut 2-3 slits in the top of each pocket so they vent while baking.
Whisk the egg and 1 TBSP of water, then use a pastry or silicone brush to brush the egg wash onto the tops and sides of each pocket.
Applying the egg wash
Bake for 20-25 minutes.
Once they’re done baking, I like to sprinkle a little more cheese on top. Then serve and enjoy!
We will usually make a double (or triple) batch and then wrap each hot pocket individually and freeze for easy meals or lunches for Jason to take to work.
Also, I have estimated all of these ingredient amounts because I am the WORST when it comes to measuring. I eyeball everything and cook by feel. So I hope I estimated correctly. The good news is that this is easily adjusted if needed. You may not need all the flour, or you may need a little extra. You’ll know by the sticky-ness of the dough, you don’t want it to stick to your hands. If the filling doesn’t thicken up enough, you can mix flour and water (usually 1TBSP of each) to add to the creamy mixture and heat until it thickens properly.
You can also get creative with the fillings. Ham and cheese, creamy turkey and broccoli, buffalo chicken, chicken bacon ranch, the list goes on. You can also play around with the seasoning you put in the dough when making it. We are more limited in our options because of our safe ingredients, but I’d love to hear how other flavors turn out. If you make these, please come report back and let us know how it went!
Speaking of safe ingredients, because of the corn allergy, I think it’s important to know that our safe products are usually very brand specific. Here’s the brands of all the safe ingredients we use for these hot pockets.
Zulka Morena sugar
Red Star active dry yeast – ONLY the red 3 pack strip
Butter – from a local dairy
Einkorn All Purpose Flour (or Einkorn Whole Wheat Flour)
Seasoning – Our Salt is Evolution Pink Himalayan, all other seasonings are single spices from Frontier Co-Op
Our eggs are from a local farm that only washes their eggs with water.
Locally grown broccoli from a local farm
Onion is also from a local farm
Kerrygold Dubliner Cheese (for some reason this is the ONLY mass produced cheese our corn allergic people have been able to handle)
Heavy Cream comes from the same dairy as our butter.
The Holiday season might be one of the most stressful for a food allergy family. There’s so many holiday traditions that involve food…feasts, desserts, baking, cookie swapping, candy, and the list goes on. However, ever since the moment we knew there were food “issues” in our family, we were determined to make sure we didn’t miss out on all the fun. Even if that means a little extra work.
The way we approach the holidays is the same way we approach everyday life. We find an item we loved in our “pre allergy” life and figure out how to make it in a safe way. Sometimes this means altering the item just a bit, sometimes it means sourcing items from a single facility, sometimes it means making everything from scratch.
Today I’m going to describe our process for cooking for Thanksgiving this past week. The prep for this meal started months ago with growing or purchasing in-season produce, in bulk, then freezing in our 3 deep freezers.
First, we came up with a menu: Turkey, Green Beans, Broccoli Casserole, Sweet Potato Casserole, Mac n Cheese, and Pumpkin Mousse Pie. Then we gathered our ingredients. Some items were in our freezer, a few things we could pick up at a grocery store, specialty store, or farm store, the rest were made from scratch.
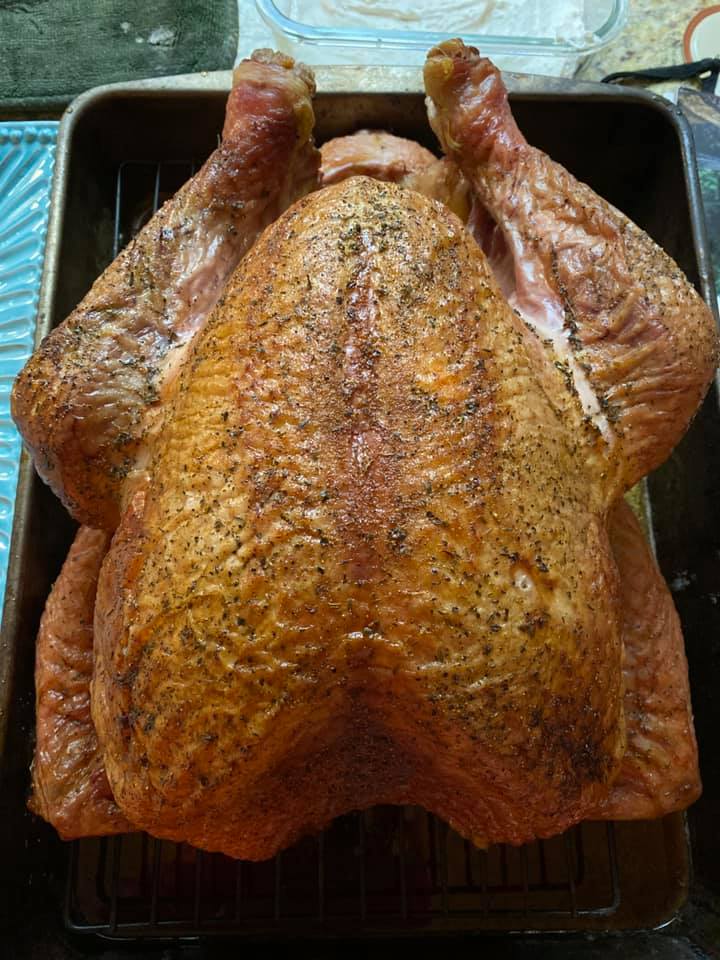
Turkey:
Our 2020 turkey straight out of the smoker.
We got a farm-fresh, never frozen turkey from our favorite local farm, Local Homestead Products. As mentioned in a previous blog, commercial meat is a no-go for us. The processing, washing, packaging, preserving…it’s all a cross-contamination risk or straight up corn product. We have locally sourced safe butter and all of our spices come from one brand, except for salt. For salt, we get himalyan pink sea salt that we grind ourselves.
To prepare the turkey, we pour melted butter on the turkey and sprinkle on salt, pepper, thyme, basil, garlic, and paprika. Then we smoked the turkey in our pellet smoker. Again, even with our pellets, we have one safe brand of 100% wood pellets that are not glued together with a corn product.
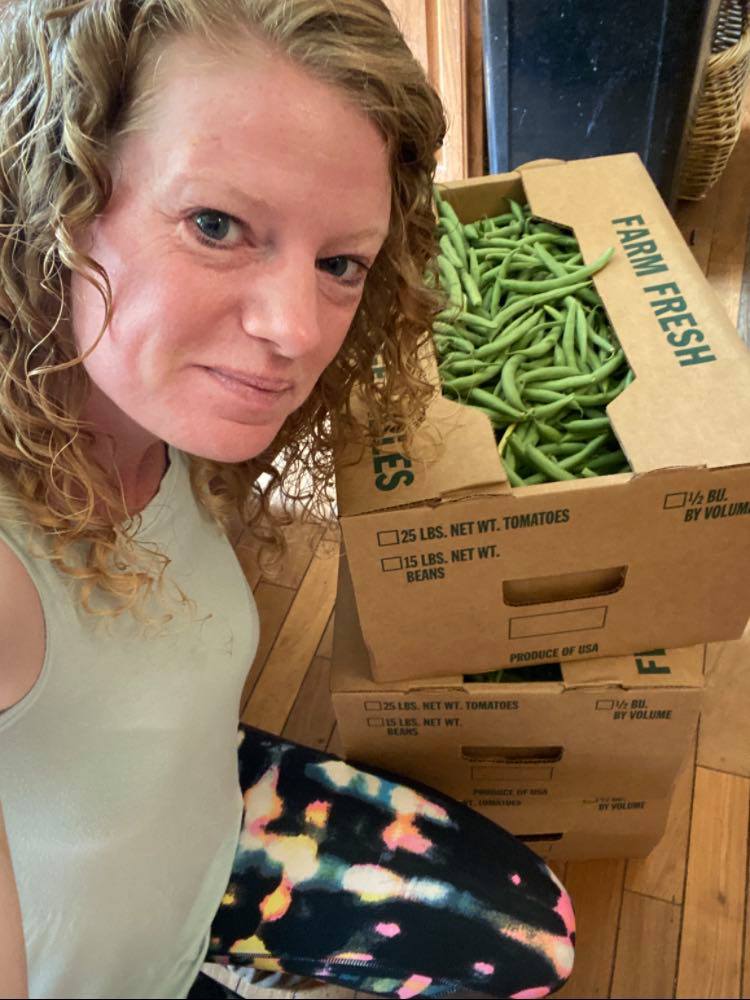
Green Beans:
Marianne and our bushel of green beans.
This was probably the easiest dish of our Thanksgiving dinner. We have geenbeans in our freezer that we bought in bulk over the summer from our local safe farm. We thawed them, threw them in a baking dish, covered them with a bit of melted butter and sprinkled salt, pepper, garlic, and cheese on them. Then we baked them at 350 for about 25 minutes. Easy peasy. Oh and we have one safe brand/type of cheese. This cheese is one of the very few items we can purchase at most major grocery stores…of course it’s $7 for 7oz, but that’s a trade off for being able to buy it in multiple locations.
Broccoli Casserole:
Marianne with our bulk purchase of broccoli and cauliflower.
Again, we had broccoli frozen in our deep freezer from a bulk purchase from our local farm earlier this year. The onion came from the same local farm. Milk and cream came from the same local dairy as our butter. The bread crumbs were from homemade bread baked earlier in the week. I stuck a few slices in the back of the fridge to hide from the kids so I wouldn’t have to bake another loaf just for this casserole. The flour we use as a thickener is Einkorn flour, a specialty, ancient wheat that is very careful not to allow cross contamination in their facilities.
To make the casserole, we chopped the frozen broccoli with my favorite pampered chef item, the food chopper. If you don’t have one, seriously, get one. You can thank me later. Then we boiled the broccoli until it was starting to become tender. While the broccoli was boiling, we made a thick white gravy (butter, flour, milk, and heavy cream) with our preferred seasonings (you’ll come to realize we use a lot of salt, pepper, garlic, and paprika). Then, we used the food chopper to chop up half an onion. We combined all the ingredients into a baking dish, then baked for 30 minutes on 350.
Sweet Potato Casserole:
The ingredients for this are simple: Sweet potatoes, heavy cream, maple syrup, and homemade marshmallows. Our sweet potatoes also come from our favorite local farm. The maple syrup is also one of those handful of products we can buy at a grocery store…but only at Wegmans. The homemade marshmallows are made with our safe sugar (specialty, unrefined cane sugar…but again, we are blessed that we can get it at multiple large grocers), gelatin, and water.
First, we peel and quarter the sweet potatoes. Then boil them until they are tender. Once they can easily break apart with a fork, we drain them and then mash them with a potato masher. Next, we pour them into a casserole dish. Add some maple syrup and heavy cream to taste, then bake at 350 for 25-30 minutes.
While it’s baking, we make the homemade marshmallow base. To do this, boil 2 cups of sugar and 1 cup of water until it’s soft ball stage, meaning when you drop a bit of the mixture into a container of cold water, it forms a soft ball. Once you get to soft ball stage, remove from heat and add 2 envelopes of softened gelatin. Then you whisk the mixture until it forms stiff peaks. (we use our kitchenaid for this) We don’t wait for the marshmallows to harden when I’m using them for this recipe, but if we were making them to be actual marshmallows, then I’d pour them into a dish and let them stiffen up for a few hours before cutting into squares.
The marshmallow batter is usually done right around the same time the sweet potatoes are done baking. So then, we pour the marshmallow onto the top of the casserole and bake for another 10 minutes, or until the marshmallows start to turn a golden brown.
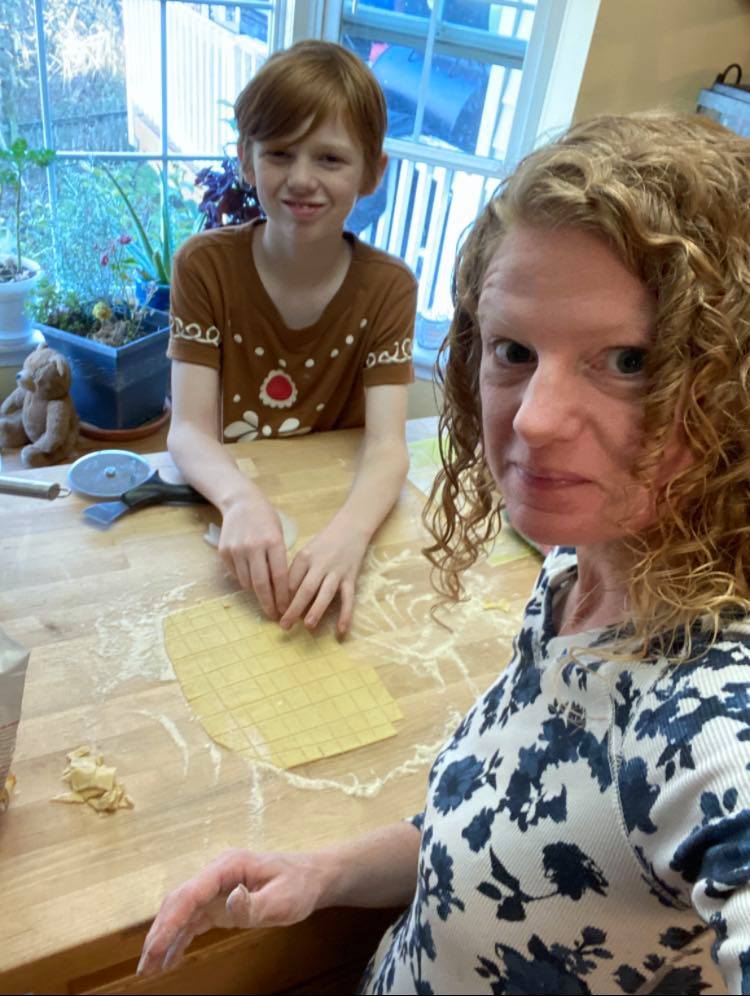
Mac n Cheese:
Marianne and JJ making bow tie pasta.
This is probably the most involved recipe of our entire meal. For this we have to make the noodles from scratch. Our noodles use the Einkorn flour, water, and butter all mixed together to form a dough. Then, we roll the dough out with a rolling pin and cut into approximately 1” rectangles with a pizza cutter. For this mac n cheese, we made bow tie type noodles, so after all the rectangles were cut, we pinched the middle of each one and then dusted them with flour. We let them dry for a few minutes (15-20) before boiling them and they tend to keep their shape better that way.
While the pasta is boiling, we made the cheesy base. We did this by making a white gravy with butter, flour, and heavy cream. Then I added spices (salt, pepper, paprika, and cayenne pepper) and cheese. When the pasta was al dente, we combined the cheesy sauce and pasta into the baking dish and added a bit more shredded cheese on top. Then bake for 30 minutes at 350.
Pumpkin Mousse Pie:
Marianne’s very first homemade pie!
This was my very first attempt at making any kind of pie. My extent of pie baking experience is opening a box and popping a pre-made pie in the oven. I was pleasantly surprised at how easy and uncomplicated this pie was.
For the crust, we baked it ahead of time so it was less to do on Thanksgiving day. We used the dough hook on the kitchenaid to mix 1 ⅓ C flour, 6-8TBSP cold butter, and 3TBSP cold water until they make a sandy, crumbly mix. We also added a little sugar, cinnamon, and nutmeg since I knew this was going with pumpkin. Once the mixture was a sandy texture, we used our hands to form it into a ball. We wrapped it in parchment paper (we don’t have a safe plastic wrap) and chilled for 15 minutes. After it cooled, we rolled it out into a circle and placed it into our pie pan. Then trim the edges so they don’t stick up over the side too far. You can pinch the edges to make a pretty crust, but I was running out of patience, so I was just happy with the fact that it was in the pan evenly. Then we baked at 425 for about 20 minutes or until it looked cooked through.
Then on Thanksgiving day, I made the mousse pie filling. In hindsight, I’d make this ahead of time as well and chill the whole pie overnight. The pumpkin I used for this is one that we grew in our own garden. I had already roasted, pureed, and frozen the pumpkin weeks ago. I thawed 2C of pumpkin puree and then combined it with 1C Heavy cream, ¾ C of powdered sugar, a pinch nutmeg, and cinnamon in a pot. (for powdered sugar, we blend our safe sugar in our Ninja until it is a fine powder). We simmered the mixture for about 10 minutes. It felt like it wasn’t quite thick enough, so I mixed 2TBSP of flour with water until it made a paste and added it to the pumpkin mixture and stirred until it thickened up just a bit more. Then we turned it off and allowed it to cool completely. While that mixture was cooling, we whipped up 2 cups of heavy cream into whipped cream. Once the pumpkin mix was cool, we folded the whipped cream into the pumpkin mixture. Once it was completely combined, we poured it into the pre-baked pie crust. It’s definitely a liquidy texture at first, so I threw it in the freezer until we were done eating dinner. This helped it set nicely, but like I said, I would make it a day ahead of time so it could chill overnight and set up better.
Then after all of that, we finally got to sit down and enjoy a meal. Whew, I’m tired just writing that all out. But it is all so worth it. The kids all said it was the best Thanksgiving dinner ever and they are requesting another full feast next week! I guess I can put this one in the win column.